Run & Automate
Build automations
An automation chains M3 APIs together and runs them across many rows of input data. Use automations for migrating data, generating reports or making bulk changes, repeatably and guarded against running in the wrong environment.
Automations are grouped in automation collections, just like APIs in Run.
Create an automation
In the Automate workspace, click New to create a collection (rename it with the pencil icon), then Add automation. The automation editor opens:
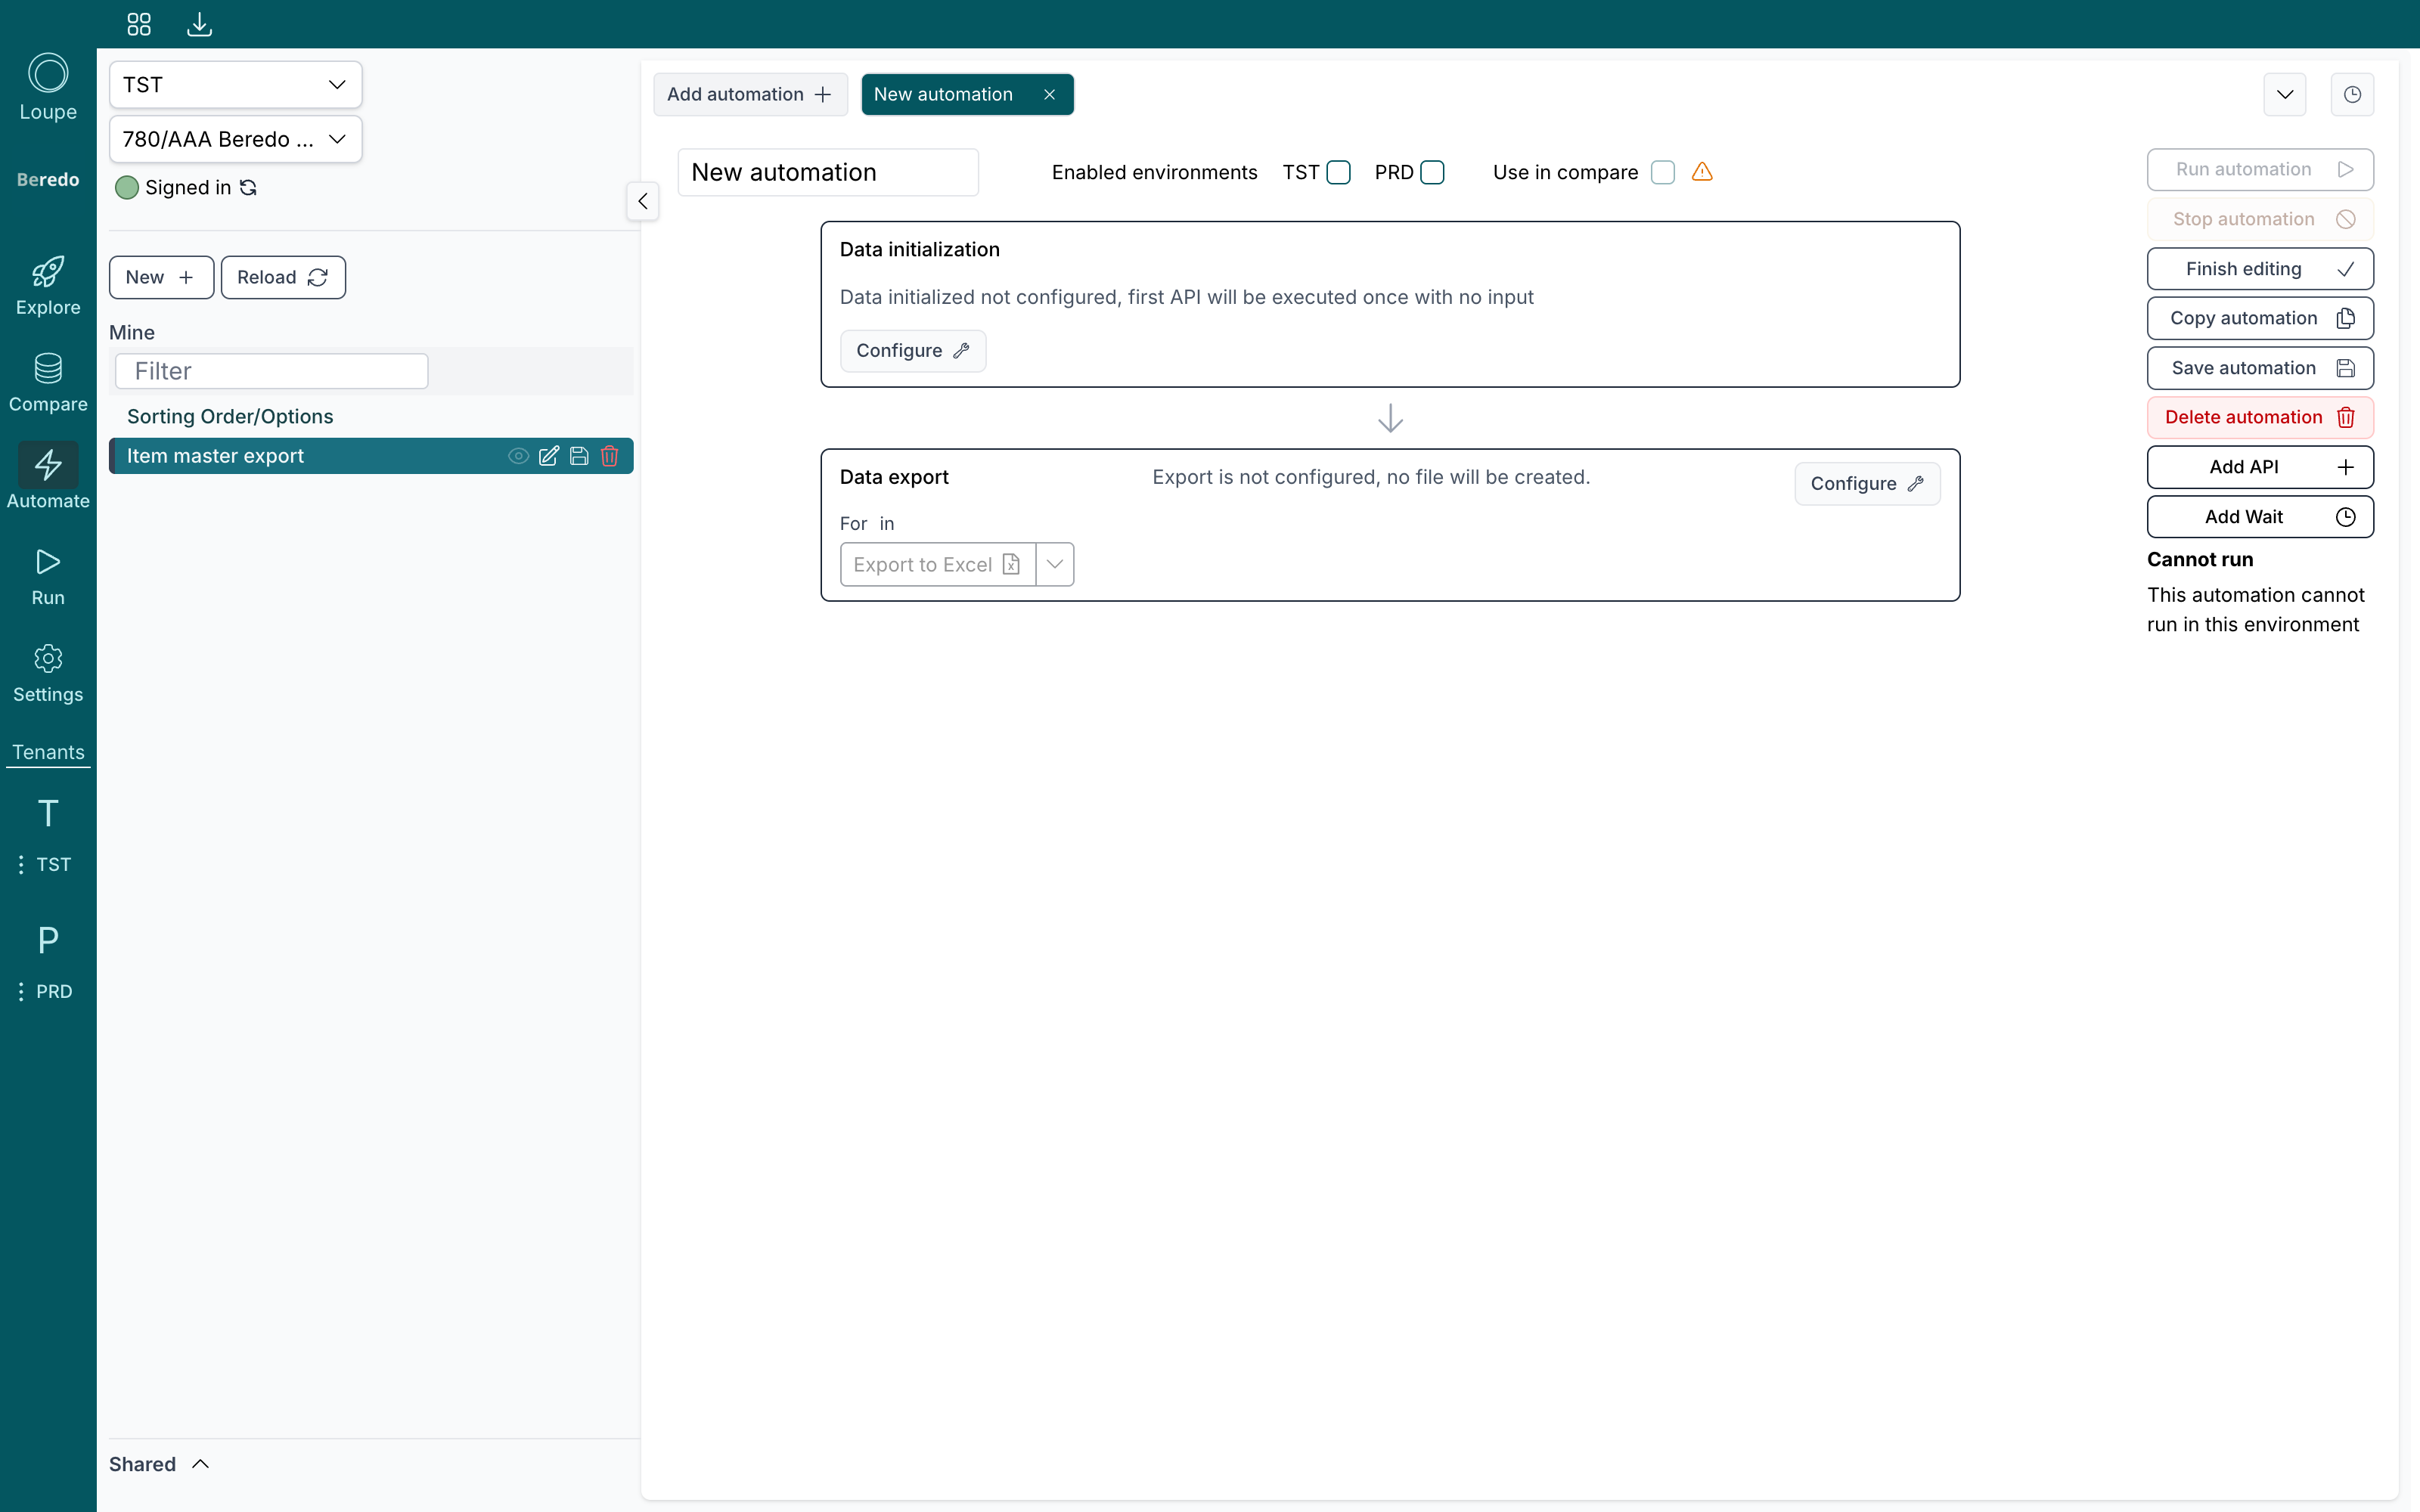
An automation flows top to bottom: Data initialization (your input rows), one or more API steps, and Data export (the result). The right-hand rail holds the run, save and edit controls. Click Edit automation to make changes, and Finish editing when you're done.
Give the automation a clear name, and tick which Enabled environments it may run in.
Enabled environments are your safety net
An automation only runs in the environments you explicitly enable. Leave production unticked until an automation has proven itself in test. Everywhere else, the Run automation button is disabled and the rail says This automation cannot run in this environment.
Set up the input data
Click Configure on the Data initialization step:
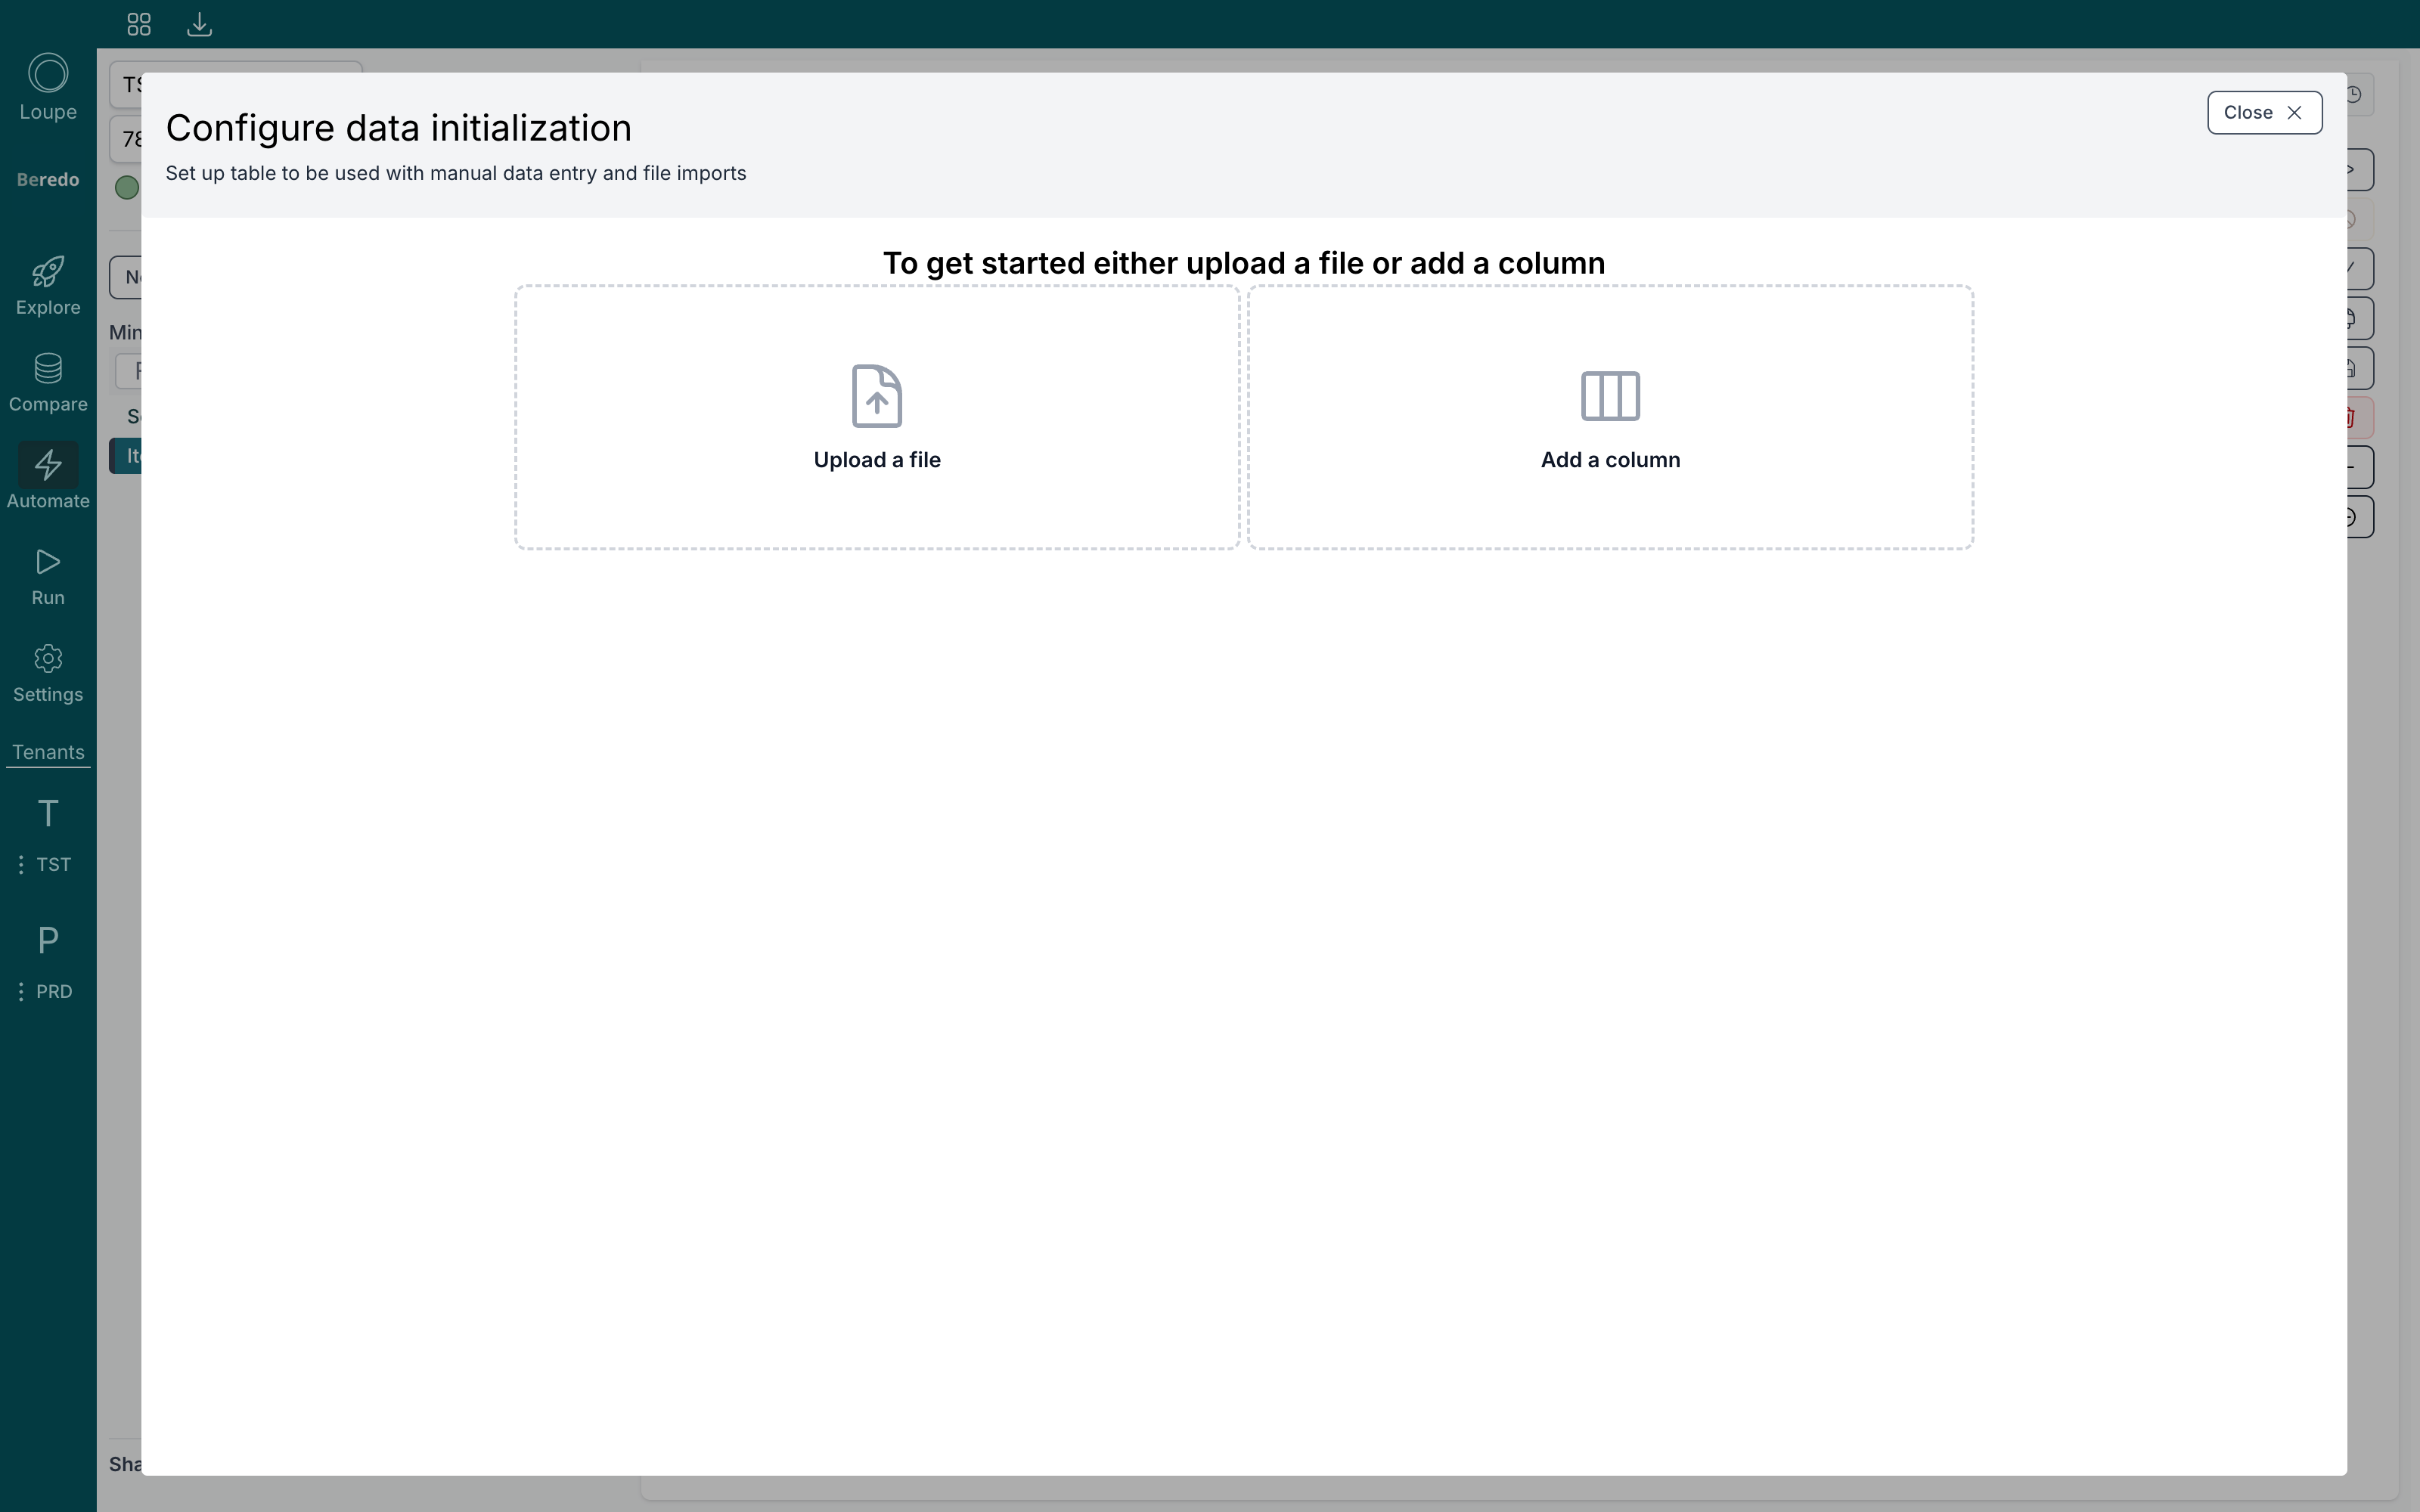
Either Upload a file or Add a column manually. Loupe reads Excel files (.xlsx, .xls), CSV files, and raw M3 exports. The file's columns become your dataset. Name each column after the M3 field it feeds, such as ITNO; that enables automatic mapping later.
Then fill the grid: Add row and type, Paste rows from a spreadsheet, or Import CSV. Recent exports lets you pick up a file you exported earlier from Compare, Run, an automation or M3:
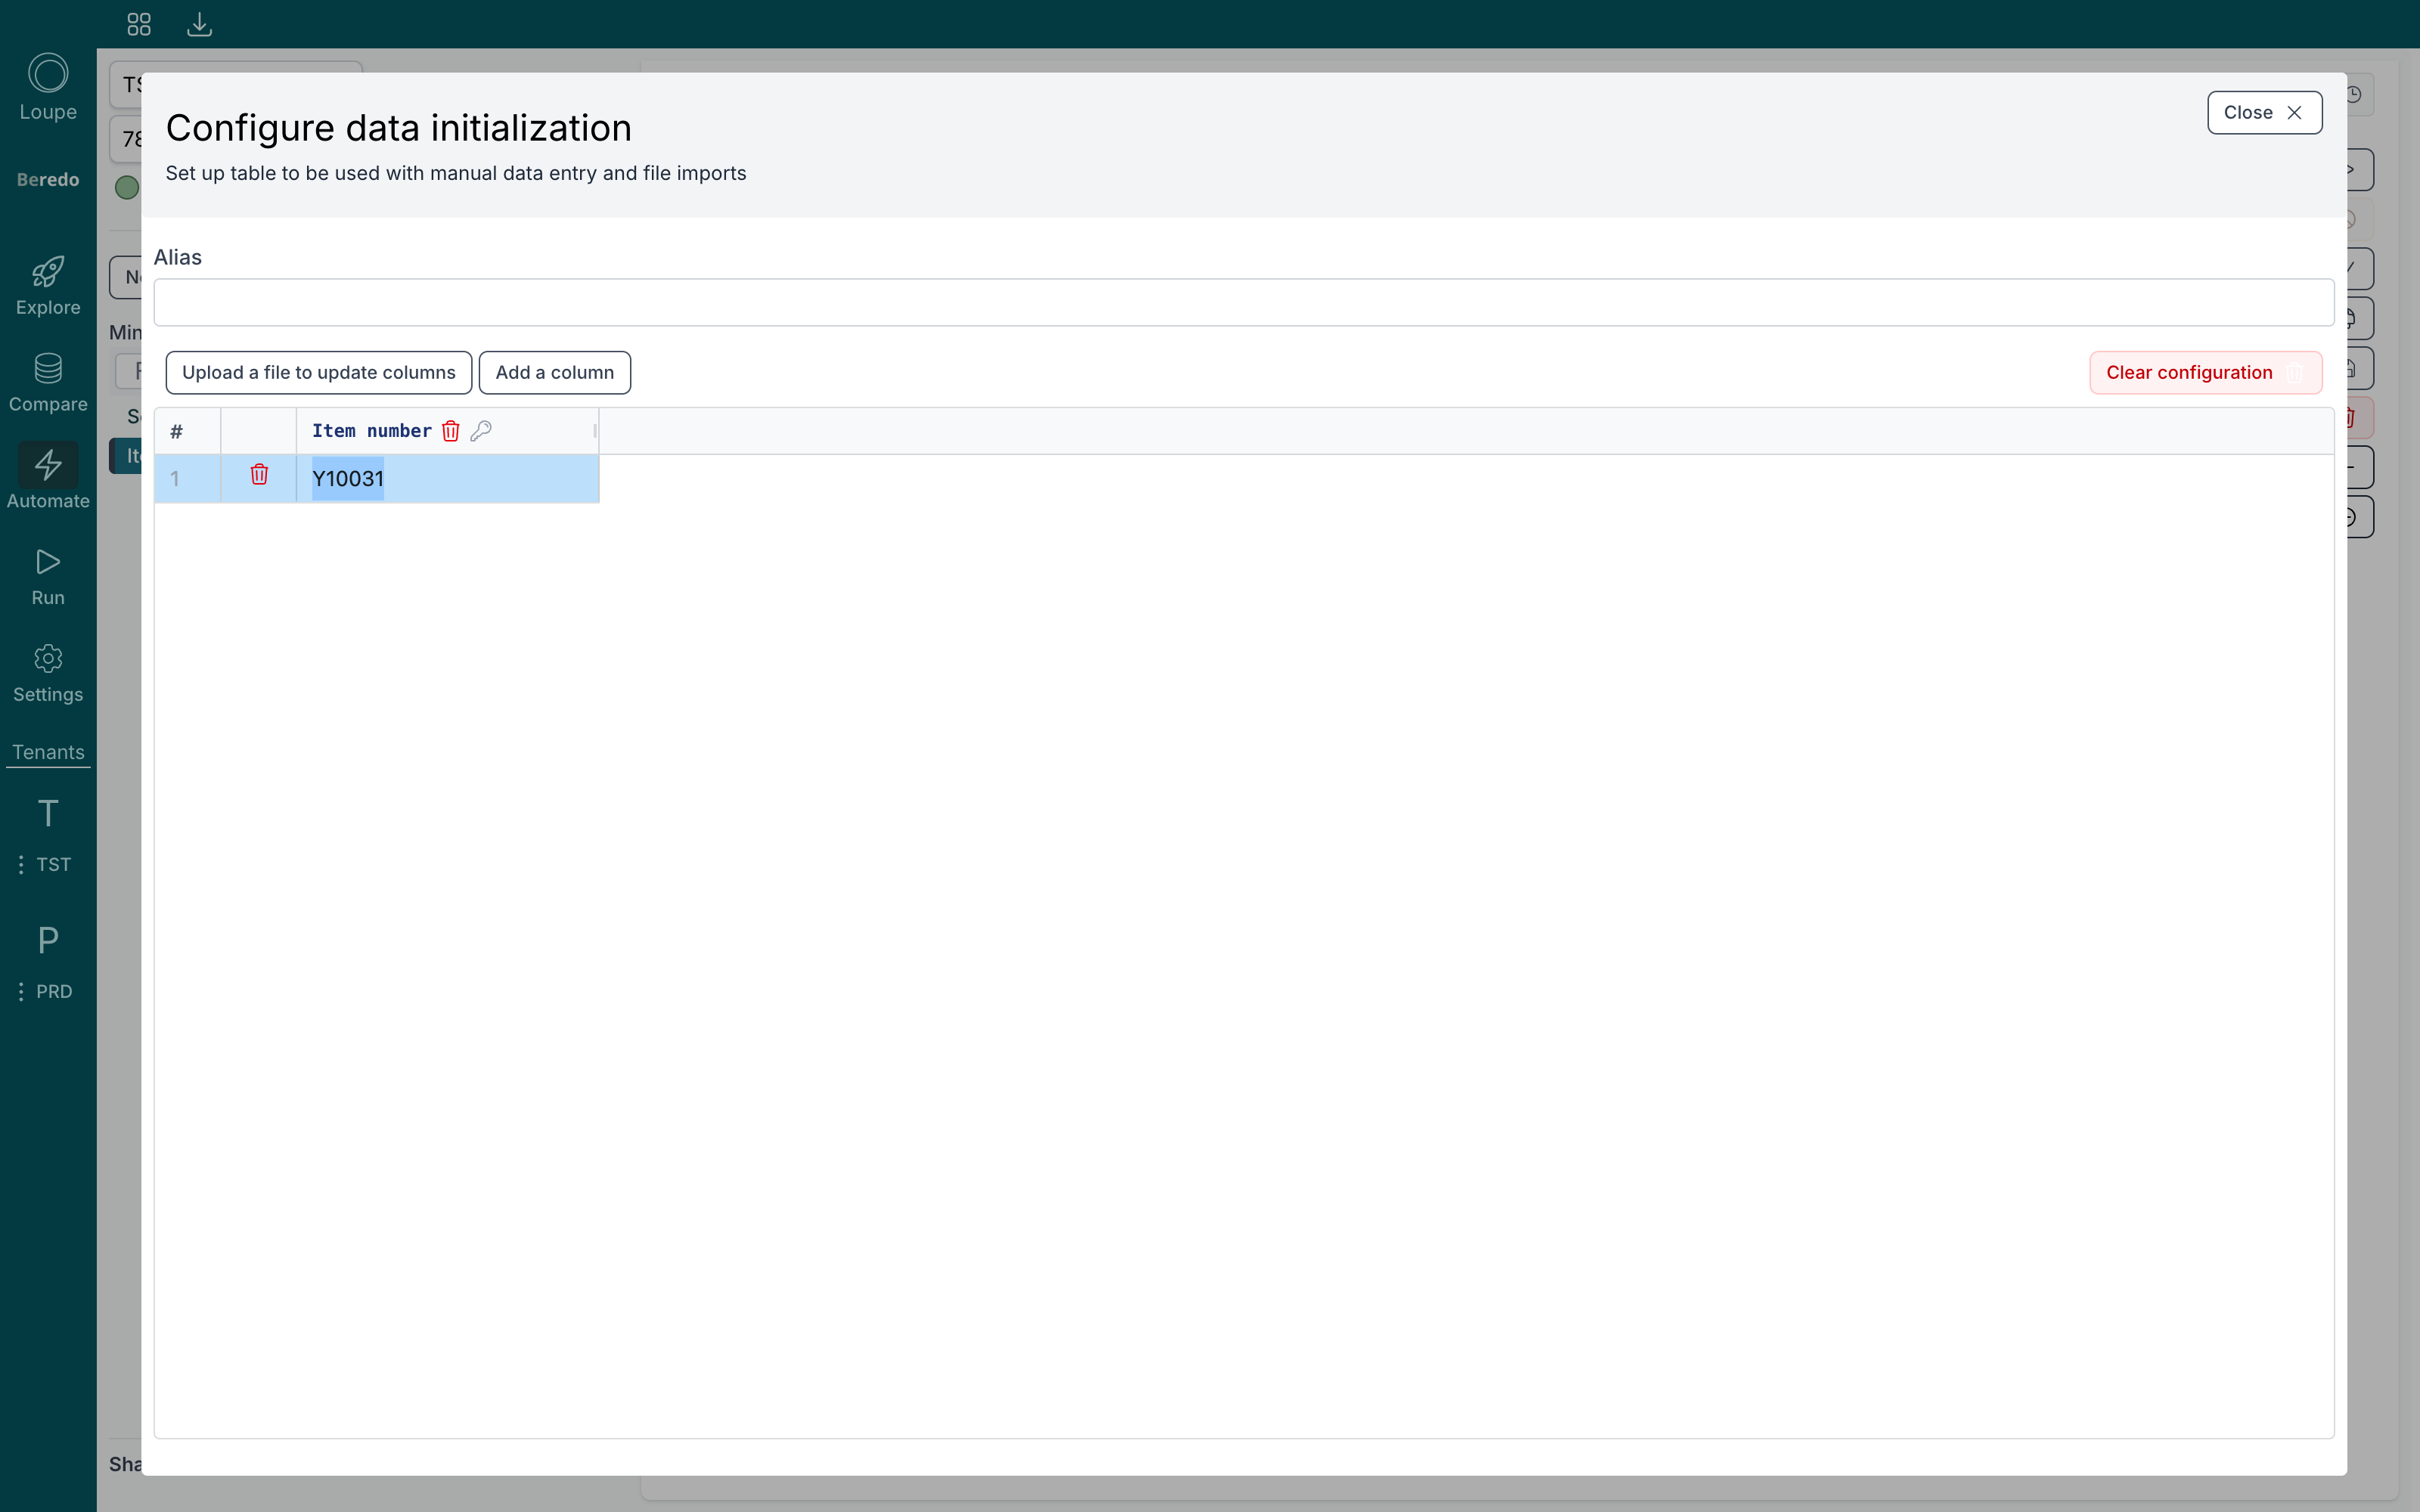
The key icon in a column header groups rows by that column. When rows are grouped, the whole automation runs once per group, and the Data initialization card shows a tab per group so you can inspect them.
An Alias renames the dataset everywhere it is referenced.
Add an API step
Click Add API in the right-hand rail. The step's configuration opens:
For … in … decides what the API iterates over. The default, for All lines in Data init, runs the API once per input row. See Datasets and grouping.
Where skips rows that don't match a condition, for example only rows where
MMSTAT = 20. Conditions can also test whether an earlier step succeeded or failed for that row.Pick the program and transaction. Instead of a program you can pick an M3 Table to read it with filters, the same way Compare does.
Map the inputs. Auto-map fields matches dataset columns to API fields by name. Or click the list icon next to any input, Map field from API or dataset, to choose the source by hand:
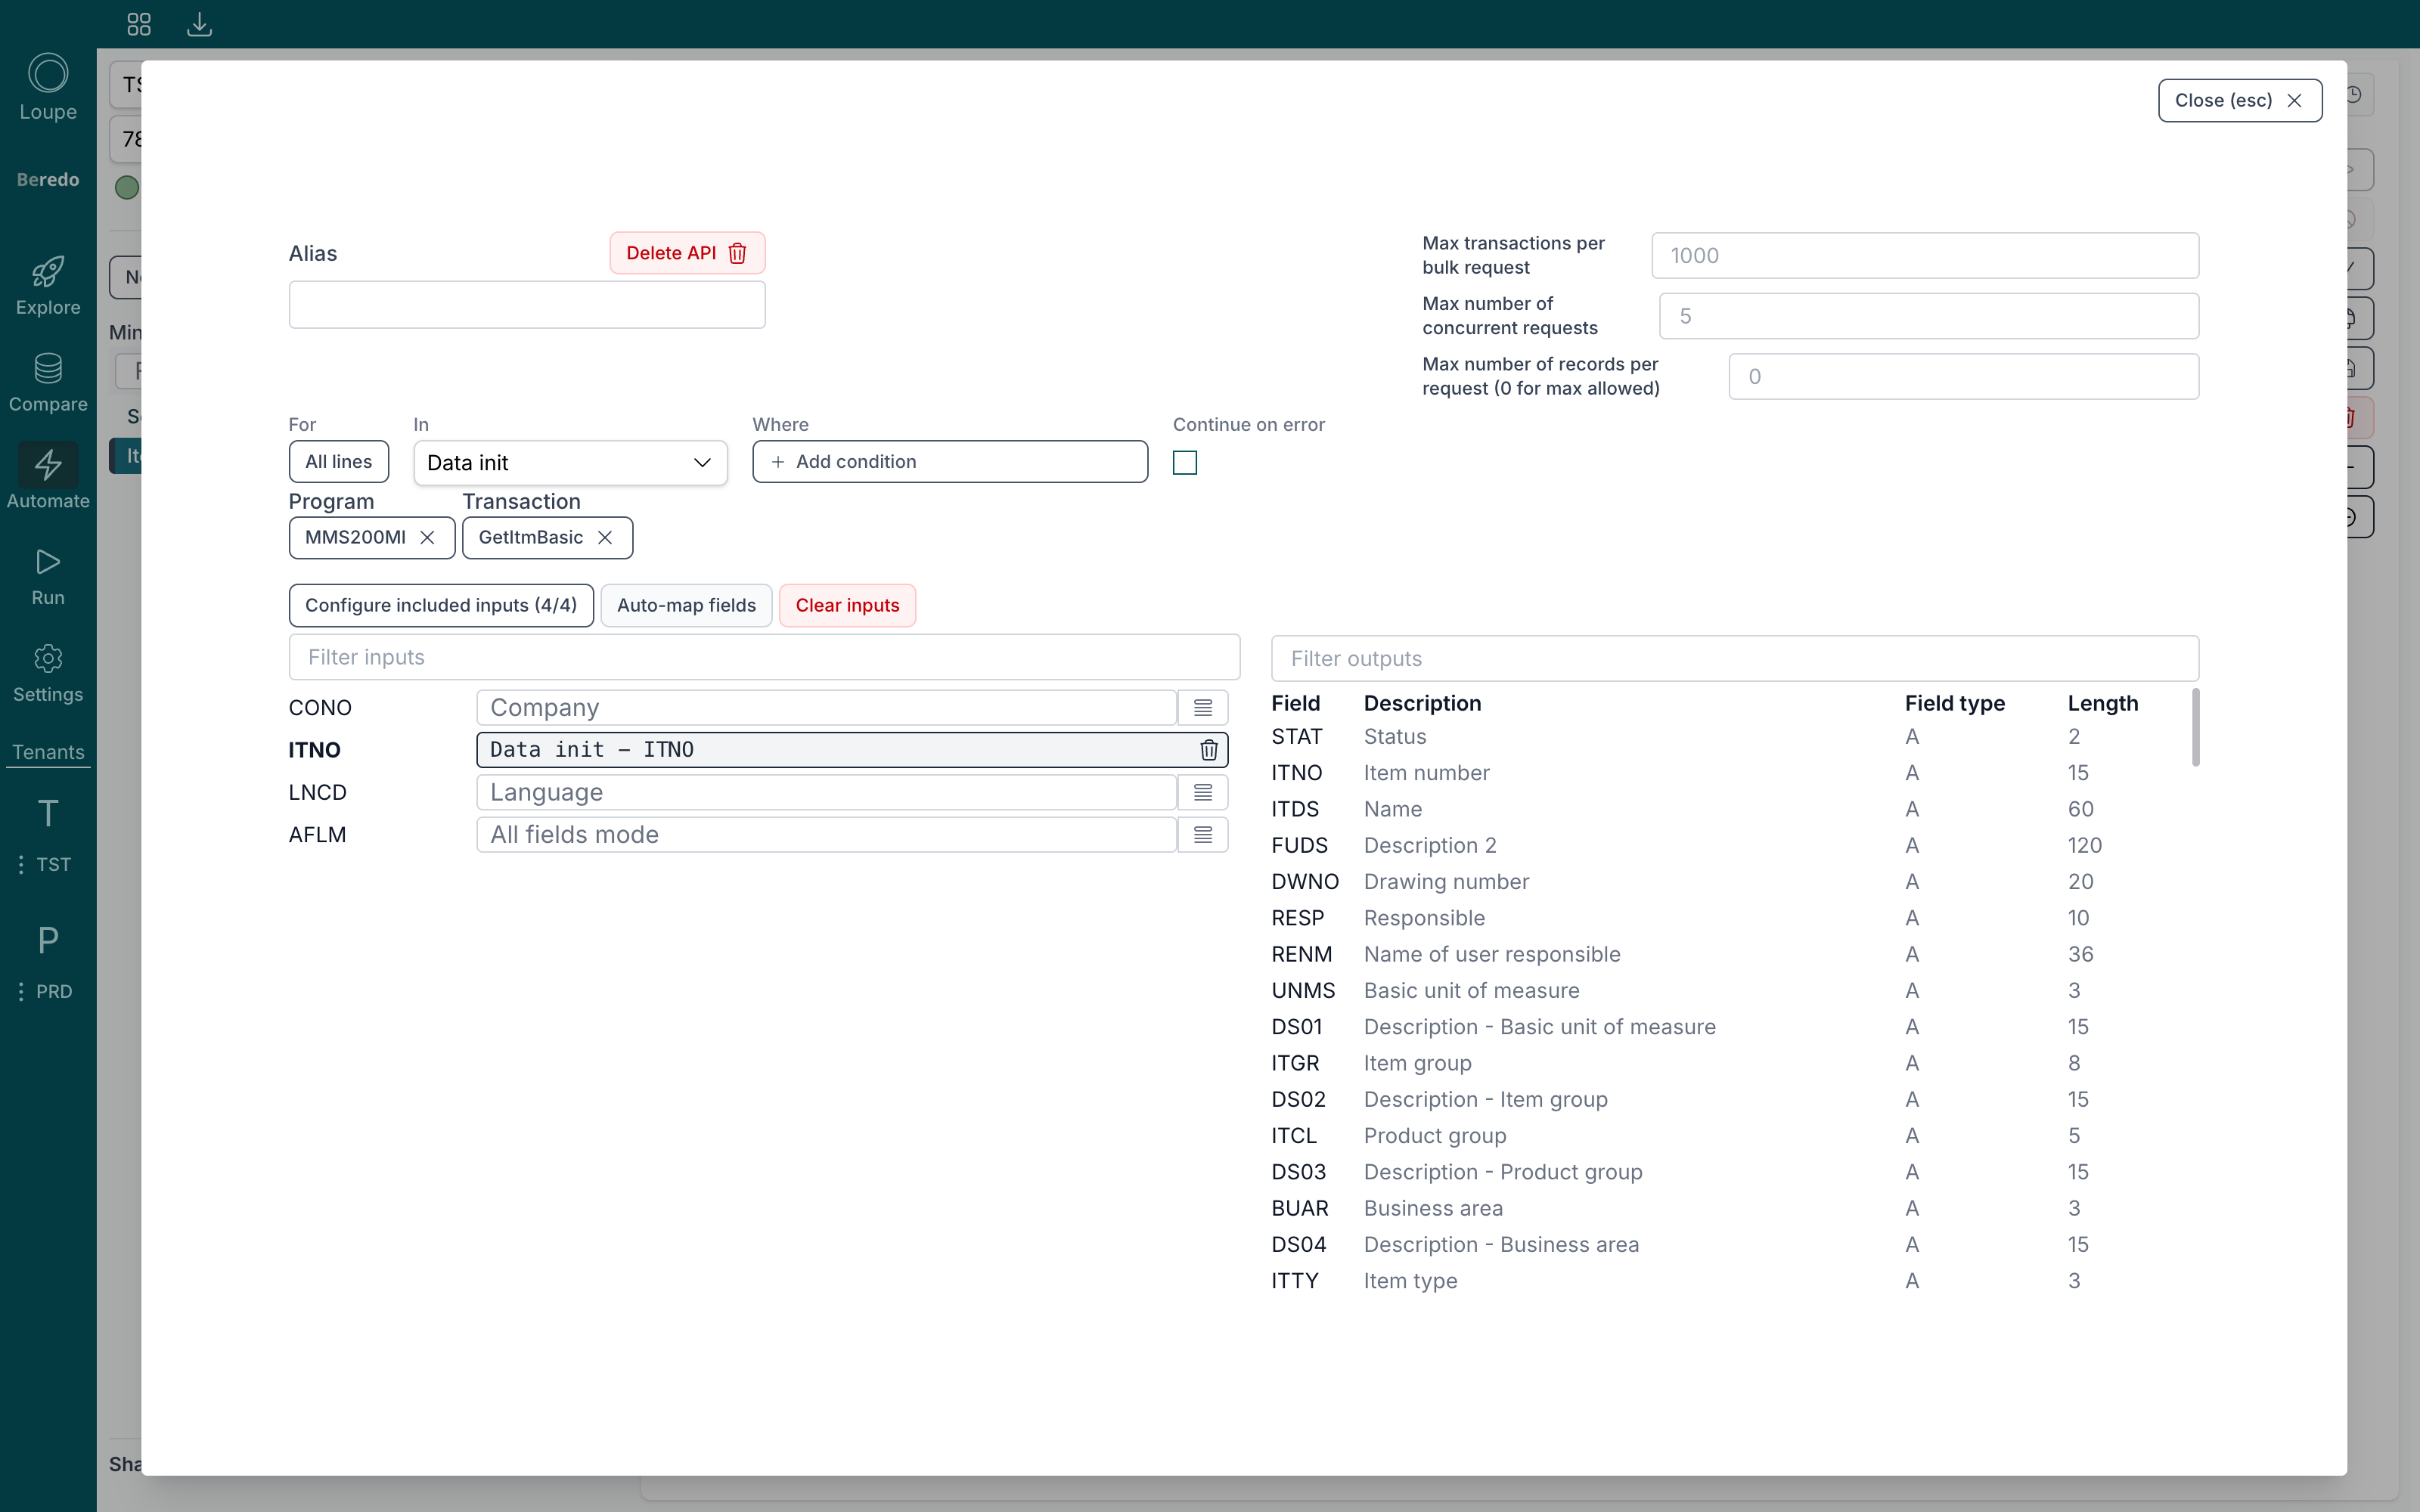
Inputs you leave unmapped can take a static value or stay empty. The current CONO and DIVI of the selected environment are always available as sources, so you never hard-code a company number. Configure included inputs hides inputs you don't need from the list.
At the top right of the step you can cap Max transactions per bulk request, Max number of concurrent requests and Max number of records per request (0 means as many as M3 allows). Leave them blank for sensible defaults. Continue on error lets the run carry on past failed rows instead of stopping at the first failure.
Close the configuration with Close or Esc. A step without a transaction is removed again.
Configure the export
Click Configure on the Data export step:
Choose which dataset the export is based on, typically the output of your last API step, and optionally a For grouping:
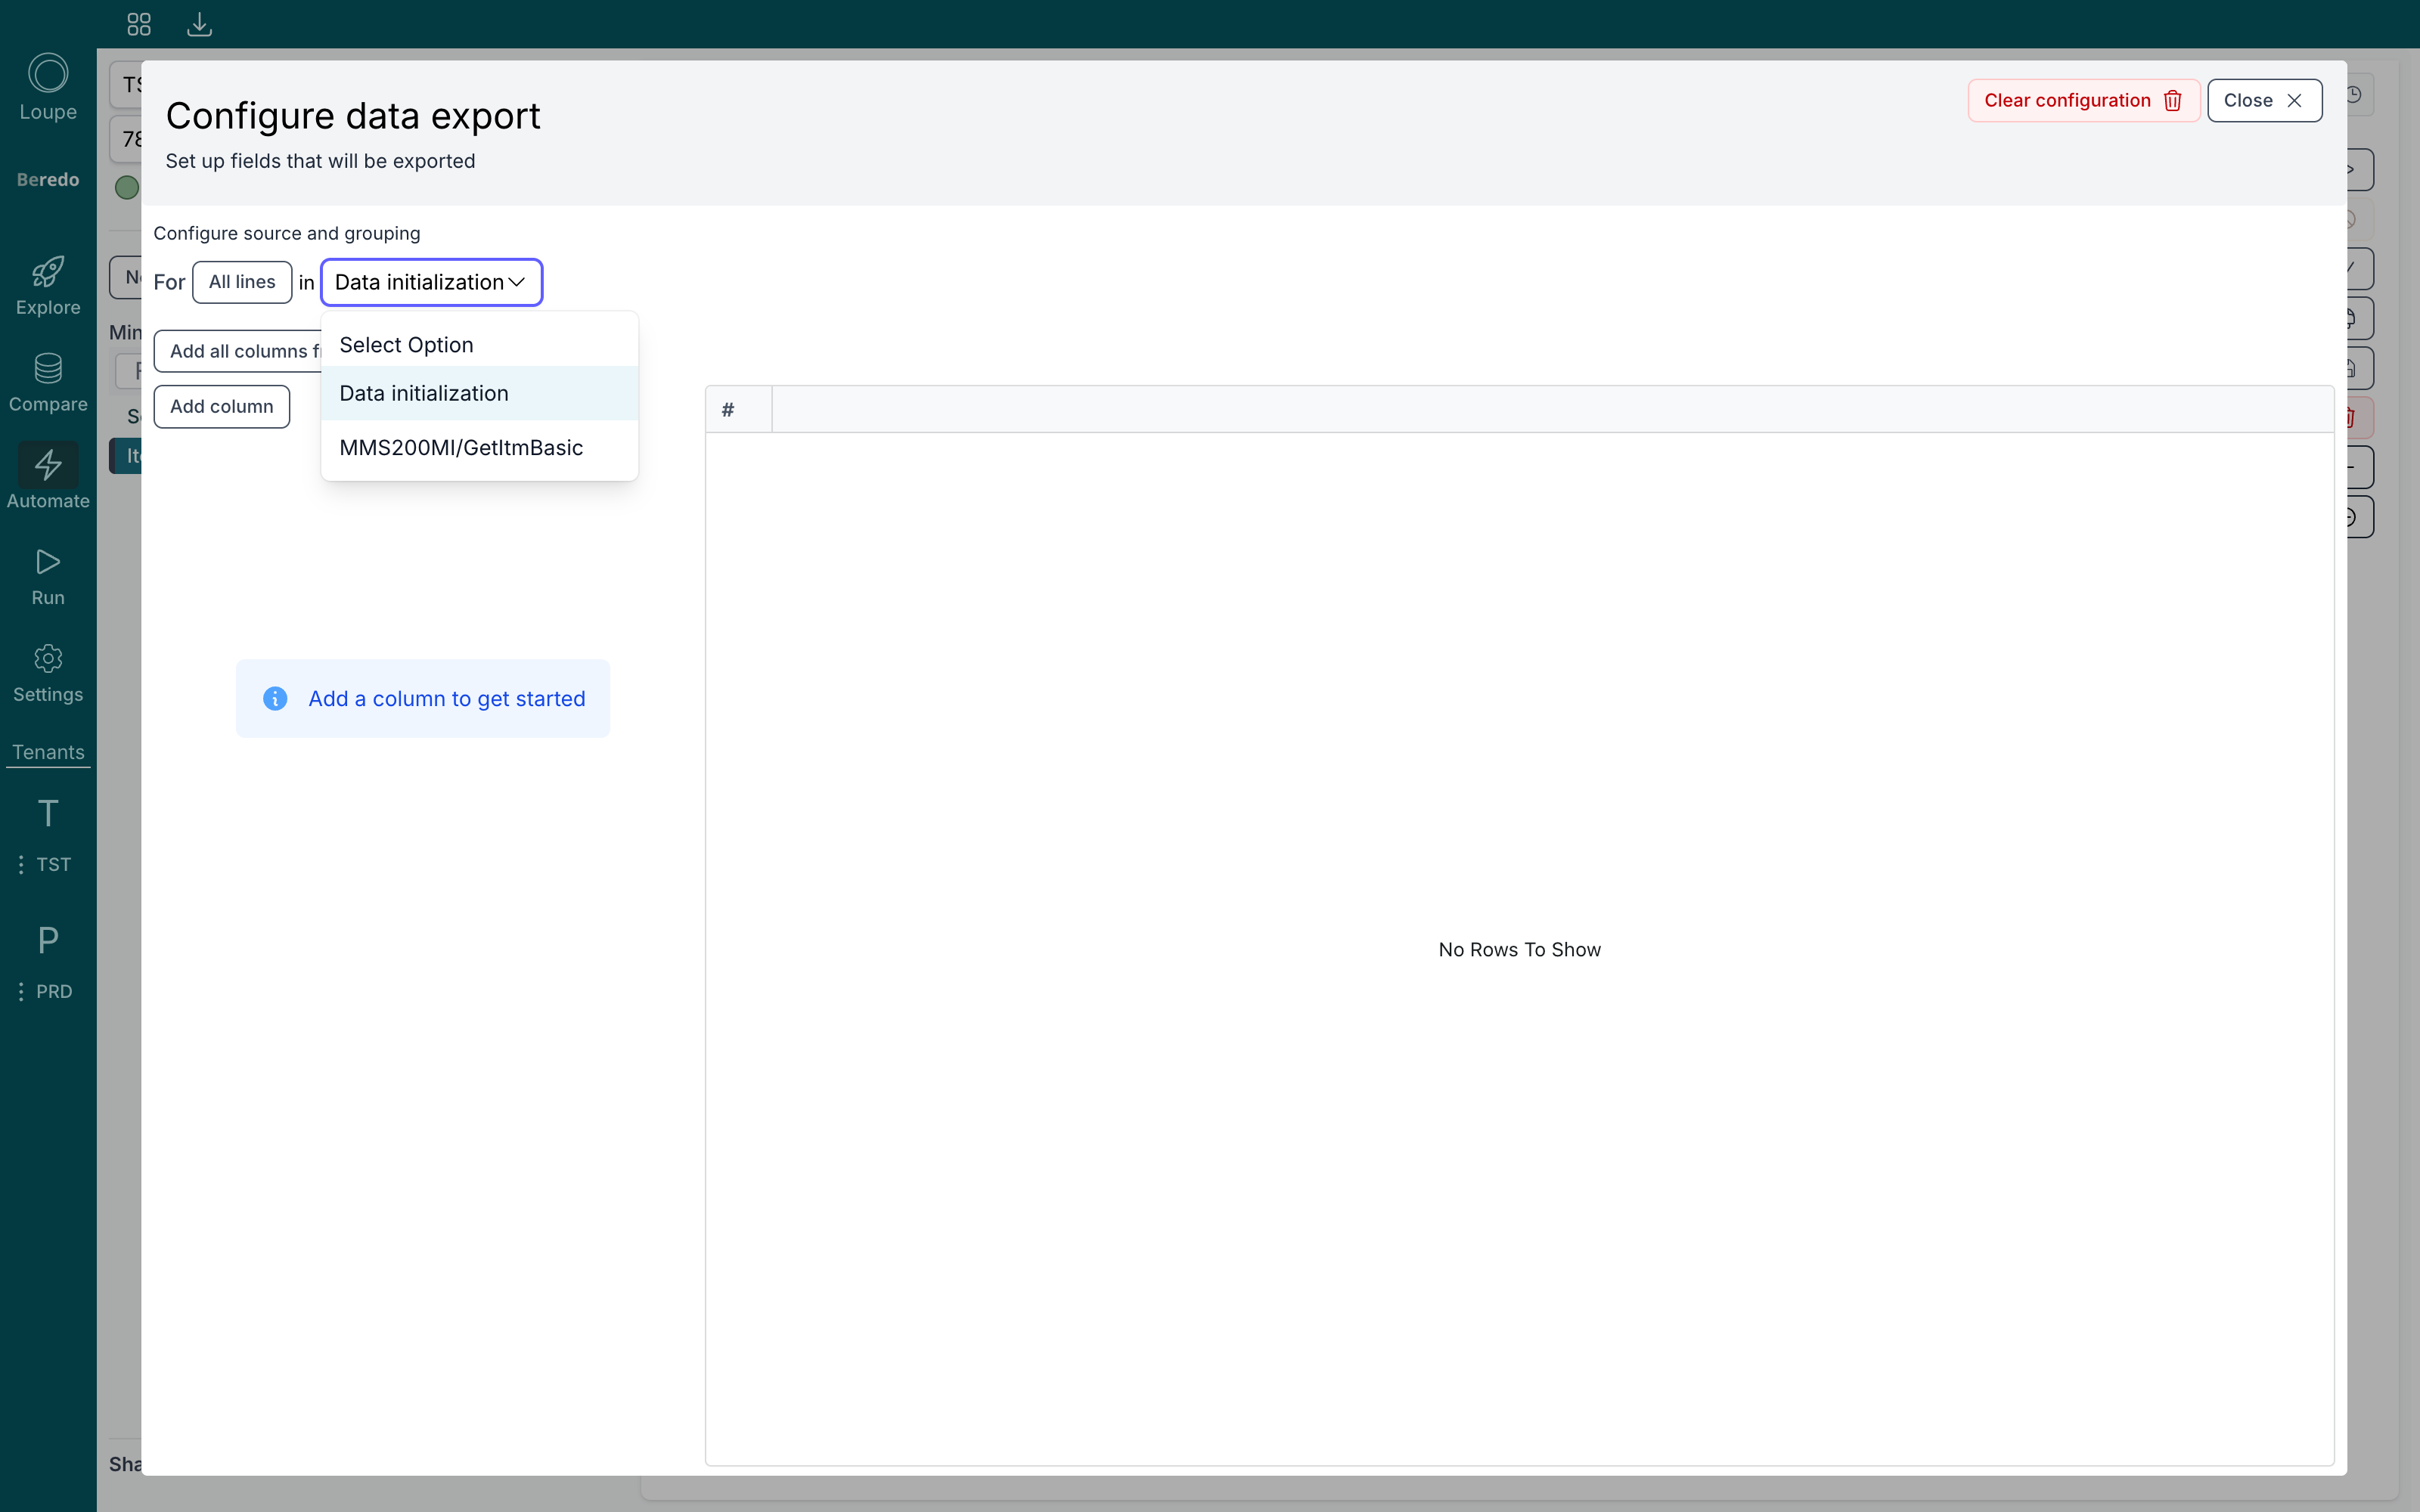
Add columns one by one with Add column, or Add all columns from source. Rename a column with the pencil, and point it at a source field with Choose source:
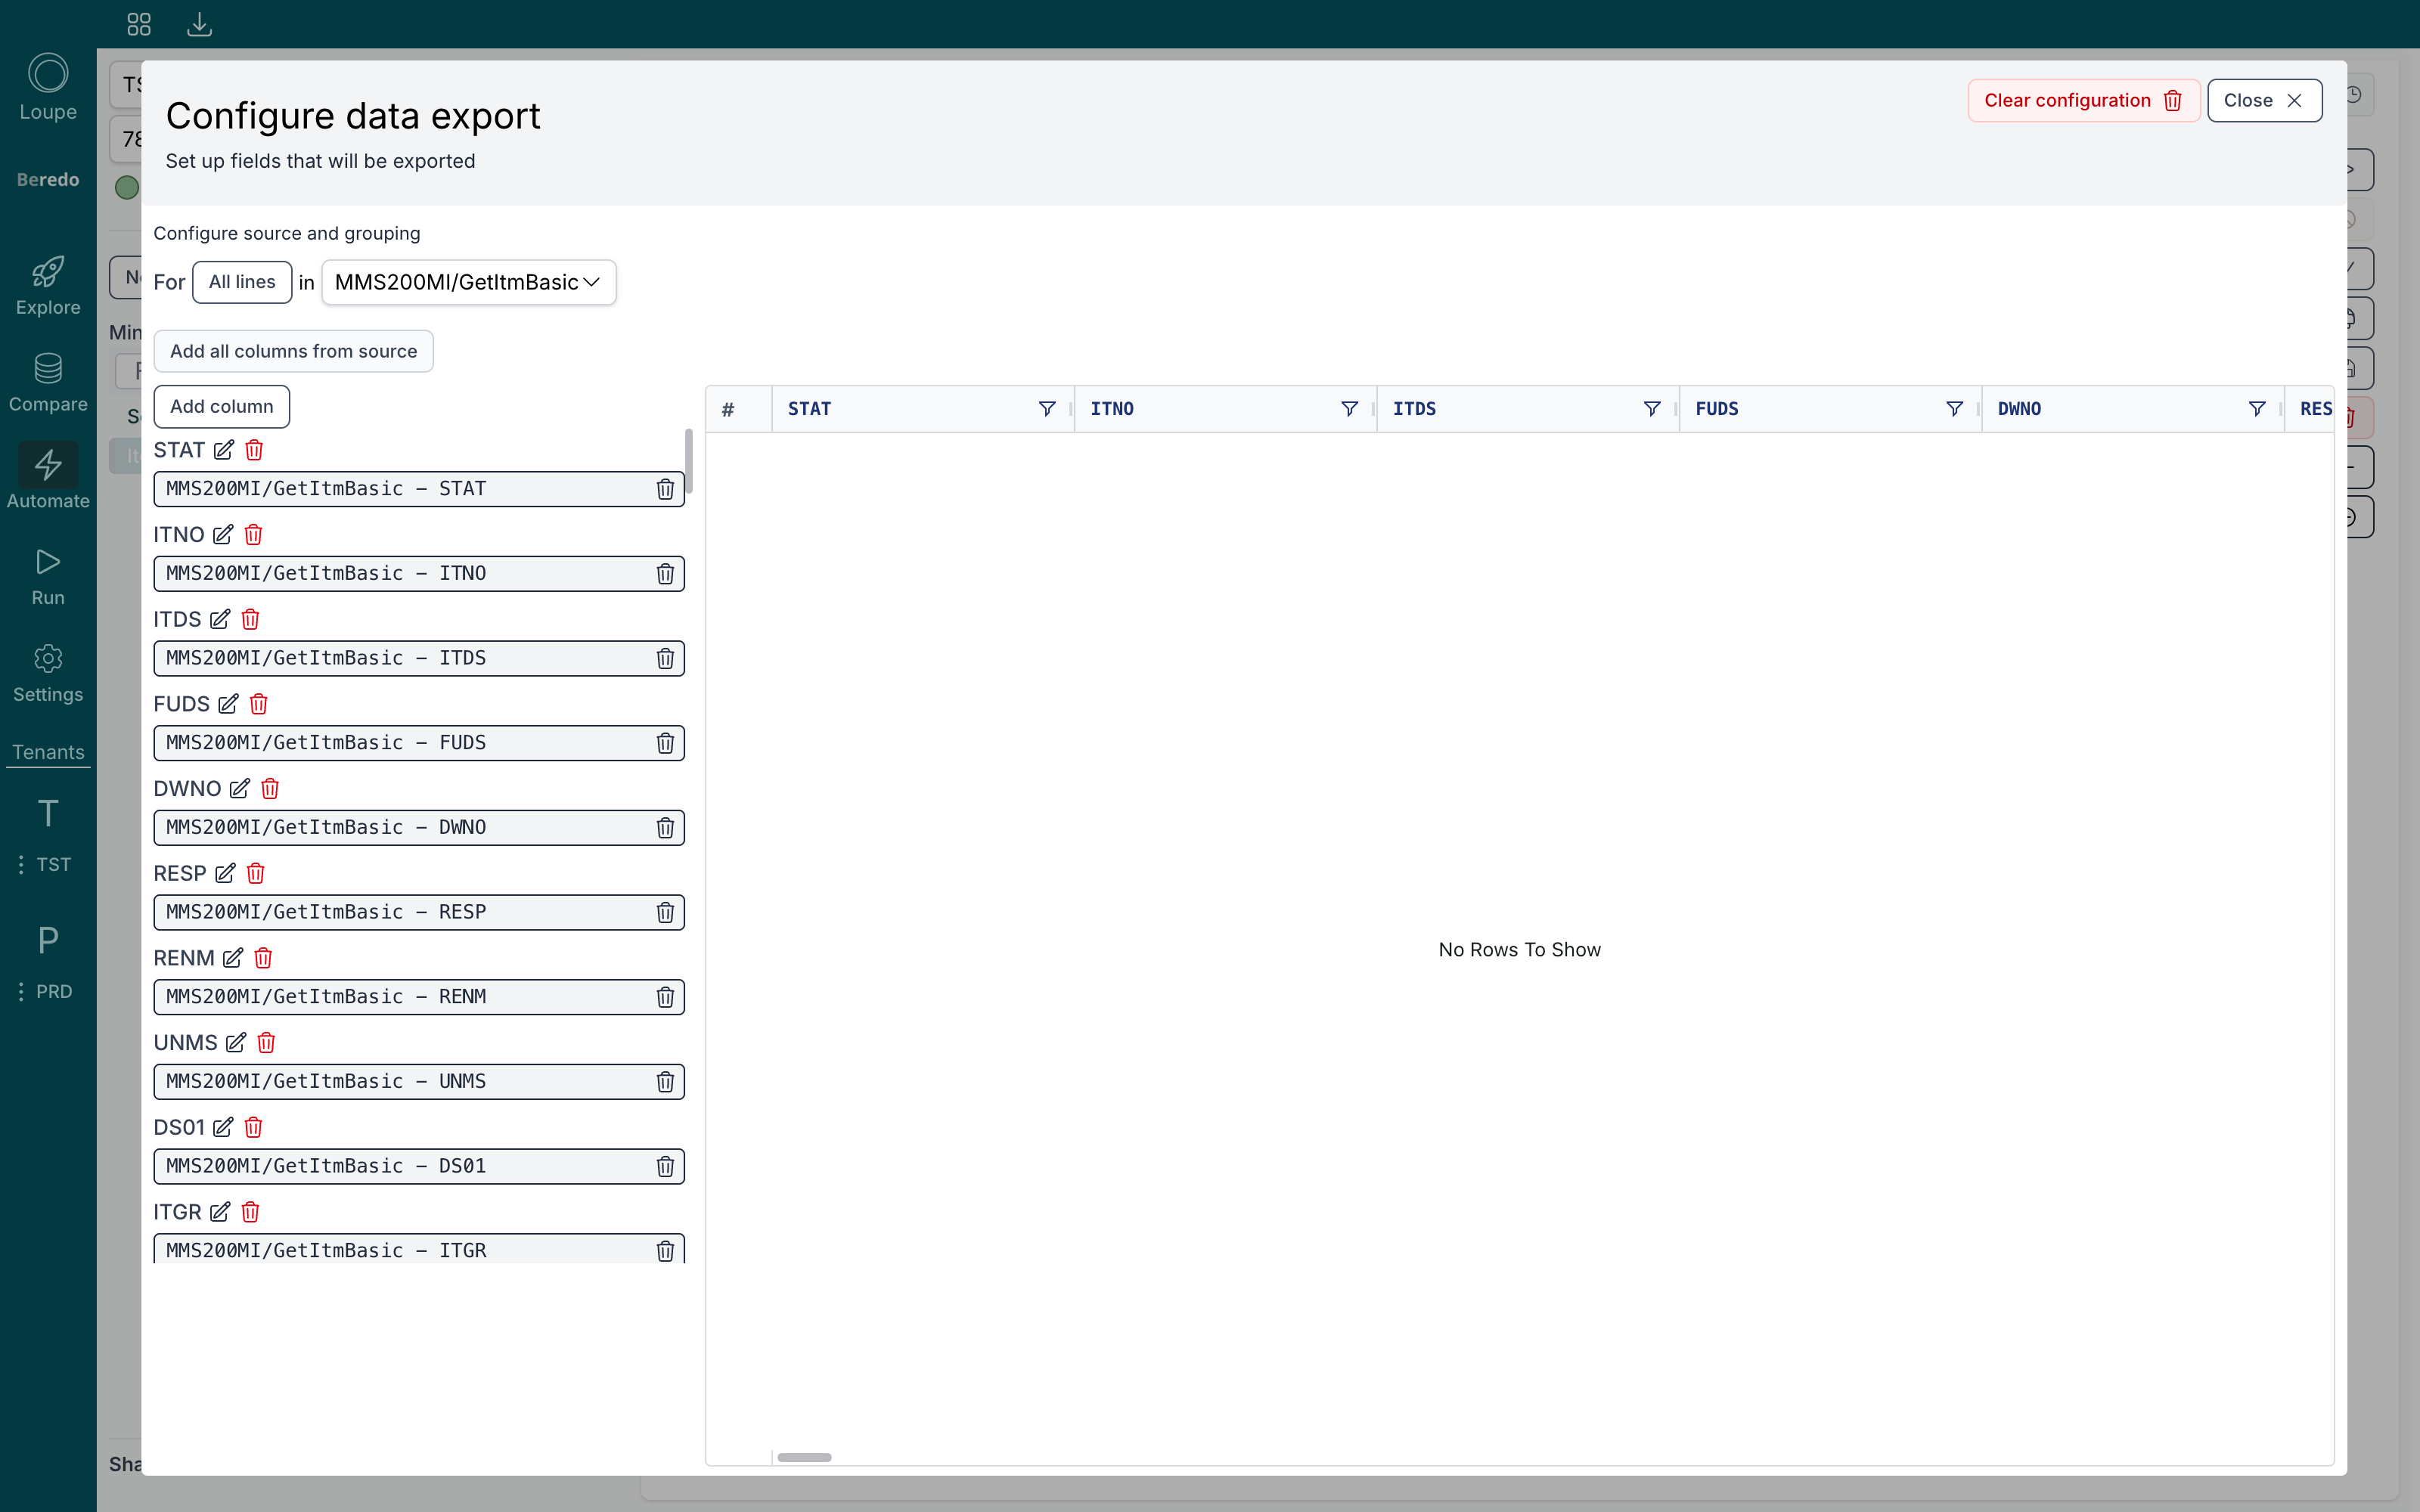
Run it
Save automation, then Run automation. If the automation contains transactions that change data, Loupe first asks you to confirm, naming the environment and company/division it will run against.
Each step reports its progress: Preparing, Running, Processing results, then Successful or Error, along with how long it took. When the run finishes, the export grid fills and Export to Excel gives you the file. Expand opens the grid full screen.
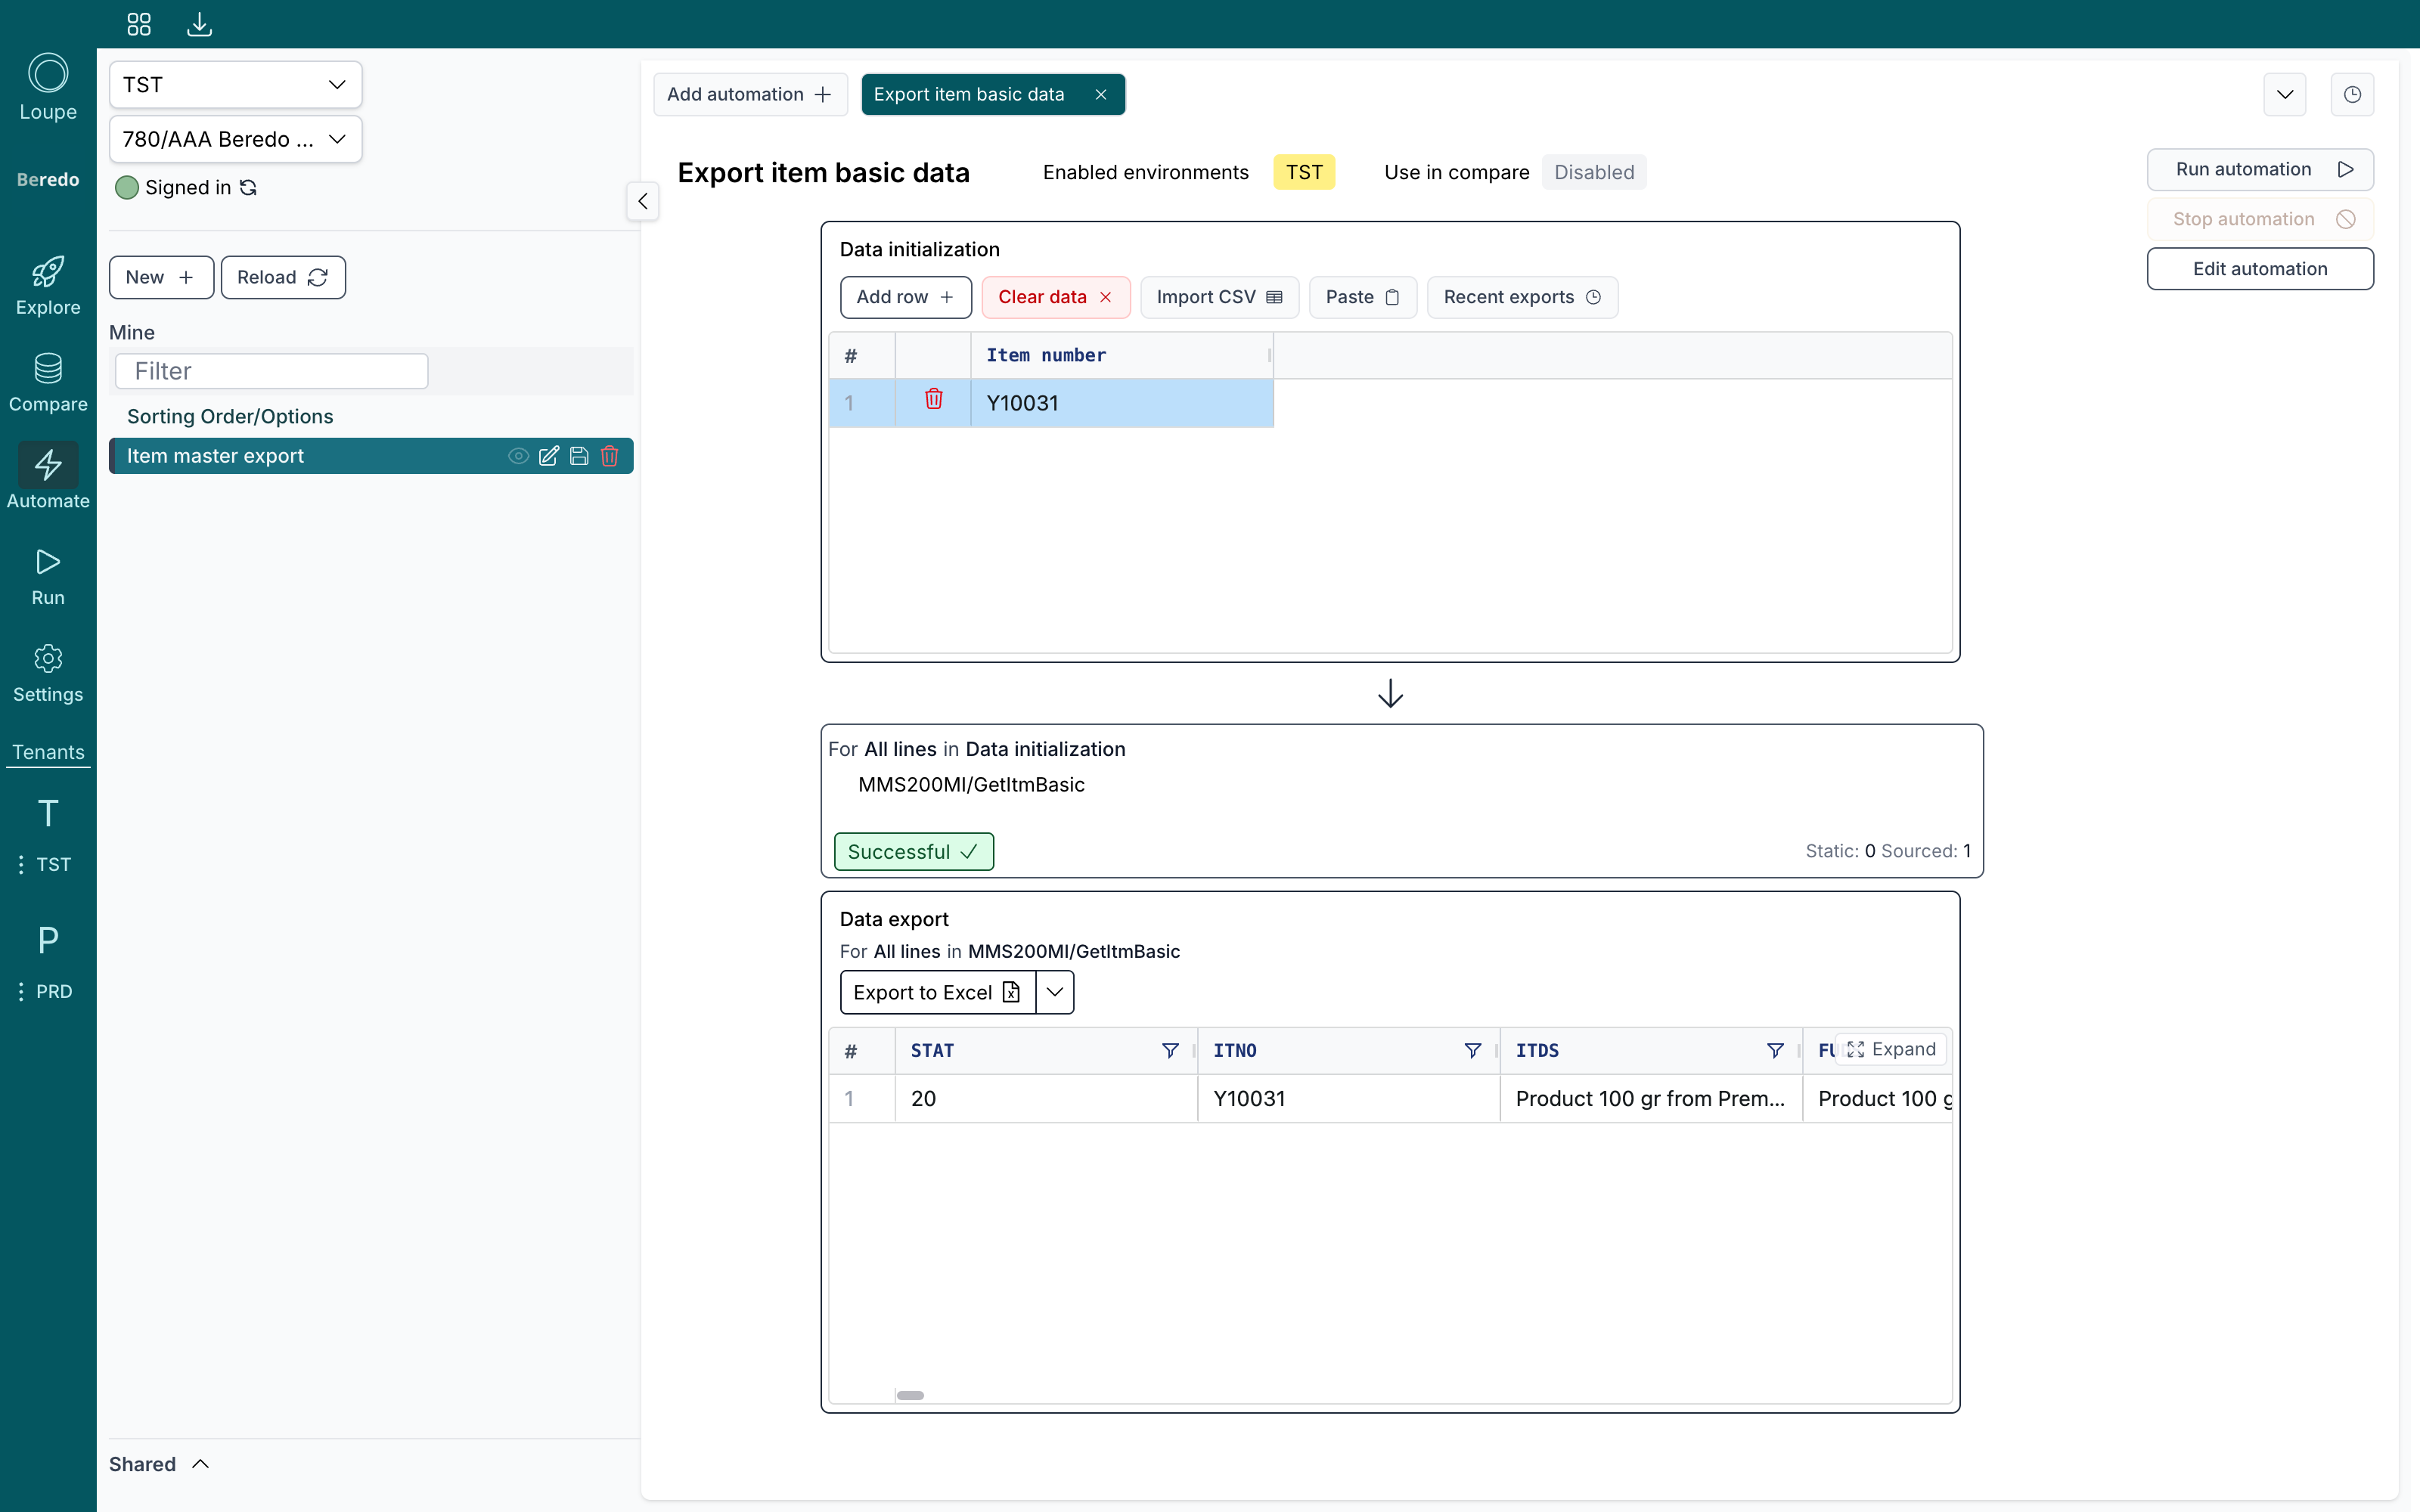
Click a step's status to open its Latest response: how many transactions ran, succeeded and failed, the errors grouped by error code, and every transaction's input and output, in a table or as JSON. Toggle Only display errors to focus on what went wrong, fix the mapping or input, and run again. Stop automation cancels a run in progress; the log then marks which transactions never ran.
If a step is misconfigured, a Validation errors button appears on it and Run automation stays disabled until you fix it. Typical causes are a missing transaction, a reference to a dataset that no longer exists, or a field that isn't in the source step's outputs.
Chain more APIs
Real automations rarely stop at one step. Click Add API again. The new step is added after the last one, and its in dropdown can point at any earlier dataset, so one API's output becomes the next API's input. Steps can be dragged into a different order.
A typical pattern: a Lst transaction fans out rows, a Get enriches each row, and the export collects the result. Add Wait inserts a pause of a configurable number of seconds when M3 needs breathing room between steps. Copy automation duplicates the current automation as a starting point for a new one.
Datasets and grouping
Every automation starts with one dataset, Data initialization. An API step that uses it as its source runs once per row, or once in total if you never configured any input data.
The For field in dataset setting controls grouping. With for All lines in Data init, the step runs for every row. Pick one or more fields instead, for Order number in Data init, and the step runs once per unique value of that field. That's how you turn a list of order lines into one AddBatchHead call per order.
Every API step produces a dataset of its own, named after its alias or its program and transaction. Later steps and the export can read from it, and can also filter on whether that step succeeded or failed for a given row.
Use an automation in Compare
Tick Use in compare to make a read-only automation available as a source in Compare. The Compare eligibility popover lists what is required: at least one API, only reading transactions (Get, Lst, Select, Search and tables), a configured data export, and a For field on the export that uniquely identifies each row.
Saving and history
Loupe saves the collection automatically a moment after every change. Save automation and Ctrl+S (⌘S) save immediately. The clock at the right end of the tab row opens the History panel, where every save is listed and any earlier version can be restored.